Exchange Server 2013 – Email Address Policy Turkce Karakter Problemi(tr-TR)


Merhaba sevgili okuyucular,
Bu makalemizde farklı bir tecrübeyi sizlere aktarıyor olacağız. Exchange Server 2013 üzerinde email address policy tanımlarken, içerisinde türkçe karakter bulunan email adreslerinin, universal bir formata nasıl convert edildiğini inceleyelim :

Örnek kullanıcı adımız : Alper ÖÜ olsun ( bu isim tamamen hayal ürünüdür ).

Yukarıda adını geçirdiğimiz kullanıcı adının mailbox adresi, email address policymiz isim.soyad@domain.com ise aşağıdaki gibi şekillenecektir :

Email Address : Ahmet.EÖÜU@domain.com

Örnekten de görebileceğimiz gibi, mailbox adının orijinalliği bozulmuş durumdadır. Bizim istediğimiz adres; küçük harfler ile samet.gozupek@domain.com olduğundan, aşağıdaki kodu powershellde koşturmamız gerekmektedir :

Exchange Management Shell :

New-EmailAddressPolicy -Name Policy_Adı -IncludedRecipients -EnabledEmailAddressTemplates “%rAa%rBb%rCc%rÇc%rçc%rDd%rEe%rFf%rĞg%rGg%rğg%rHh%rİi%rIi%rıi%rJj%rKk%rLl%rMm%rNn%rOo%rÖo%röo%rPp%rQq%rRr%rS
s%rŞs%rşs%rTt%rUu%Üu%rüu%rVv%rWw%rXx%rYy%rZz%g%s@domain.com”

Bu komut ile birlikte, karakter harfleri bozuk olan tüm mailboxlarımızdaki email addressleri, küçük harfle isim.soyad@domain.com olarak revize olacaktır.

Teşekkürler…

How to increase the maximum number of ActiveSync Devices for a User


How to increase the maximum number of ActiveSync Devices for a User

By default Exchange 2010 limits users to a maximum of 10 devices. While this limit might seem more than adequate, you might find in today’s tablet-driven world, you need to increase it…

Exchange ActiveSync devices are popping up everywhere, from being the only way to connect to Exchange from the new Surface RT tablet, an option in the new Outlook 2013, to the preferred way to connect just about every Android tablet, phone and i-Device on the market.

One component of Exchange, throttling policies by default limits users to a maximum number of device relationships and concurrent devices. And there’s a difference between the two – it’s feasible a user might have a couple of Windows 8 PCs, and rarely use one connected to Exchange, replaces their devices fairly regularly and doesn’t remove older devices immediately, or simply upgrades the firmware on their Android device at every opportunity and re-creates the device relationship. Whatever the reason, you might want to consider increasing the maximum number of devices for these users.

We can increase this limit by creating a new Throttling Policy with non-default settings and assigning it to the user (or multiple users) via the Exchange Management Shell.

To create the new policy, we’ll use the New-ThrottlingPolicy cmdlet and increase the number of devices and concurrent devices to 20:

New-Throttlingpolicy “Increased ActiveSync Devices” -EasMaxDevices 20 -EasMaxConcurrency 20 Set-Mailbox steve -ThrottlingPolicy “Increased ActiveSync Devices”

Once in place, the user can now have up to 20 devices connected to Exchange, and you can re-use the policy against other users. If you later decide to increase or decrease this limit, you can simply change the single policy we’ve created and set the number of and concurrent devices to a different number:

Set-Throttlingpolicy “Increased ActiveSync Devices” -EasMaxDevices 25 -EasMaxConcurrency 25

So with the help of a little Throttling policy modifications, an increase in ActiveSync devices can both be controlled and you can avoid an administrative headache.


Merhabalar;

Exchange Server ortamlarında sıkça gelen isteklerden biri de mail’lere imza eklenmesidir.

Imza ekleme işlemini gerçekleştirmek için;

1)Exchange 2010 Management Console’u açalım.

2)Organization Configuration-Hub Transport-Transport Rules kısmına gelelim ve

New Transport Rule komutunu vererek kullanıcılarımız için imza kuralını oluşturmaya başlayalım.

3)Kuralımıza bir isim verelim.

4)From users and that are inside or outside the organization’ı seçelim ve Inside organization diyelim.

5)Actions ekranında “append disclaimer text and failback to action if unable to apply” seçeneğini seçelim ve alt kısımdan

Disclaimer Text‘e basarak kuralımızı yazalım.

Ben imza’da kullanıcının active directory’deki özelliklerinden Firstname,Lastname,Department,Telephone,Company

Street,City,State,Zip Code bilgilerinin getirilmesini istedim.

Aşağıdaki kodu kopyala yapıştır yapalım.

html
body
table border=”0″ width=”100%”
tr
td width=”85″
img border=”1″ src=”http://10.0.0.1/resim.jpg”
/td td valign=”top” font face=”Garamond”
b %%Firstname%% %%Lastname%% /b /font br
font size=”2″ face=”Calibri” %%department%% br
Telephone: %%Phone%% br
%%Company%% br
%%Street%% br
%%City%%, %%State%% %%ZipCode%%
/font /td
/tr
/table
/body
/html

%%Firstname%% %%Lastname%%
%%department%%
Telephone: %%Phone%%
%%Company%%
%%Street%%
%%City%%, %%State%% %%ZipCode%%


6) Exceptions kısmını next ile geçelim.

7)New butonuna basarak kuralımızı oluşturalım.Atılan deneme mail’indeki ekran görüntüsü aşağıdaki gibi olacaktır.

Converting a VMDK to VHD with Microsoft Virtual Machine Converter (MVMC)


The Microsoft Virtual Machine Converter (MVMC) Solution Accelerator is a Microsoft-supported, stand-alone solution for the IT pro or solution provider who wants to convert VMware-based virtual machines and disks to Hyper-V-based virtual machines and disks. The MVMC solution can perform full conversions of VMware-based virtual machines as well as conversions of VMware-based virtual hard disks to Hyper-V-based virtual hard disks (VHD).

Hyper-V-based virtual hard disks can be used in Windows 8 with the Hyper-V role installed. This way you can, for example, stop using VMware Workstation.

Let’s get going:

Download the software from Microsoft here
Install the Microsoft Virtual Machine Converter Solution Accelerator
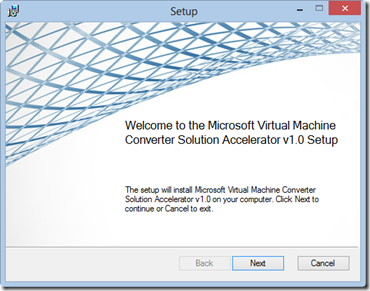
Click Next
SNAGHTML82e27a3
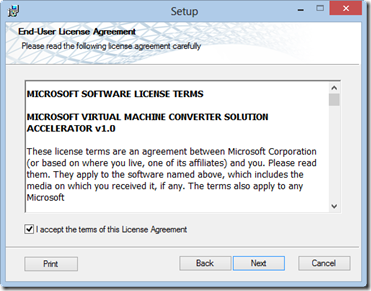
Click I accept, click next SNAGHTML82ea966
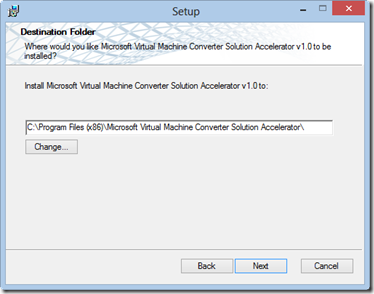
Click Next SNAGHTML82ee361
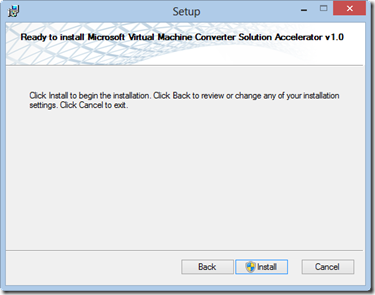
Click Next SNAGHTML82f0e3a
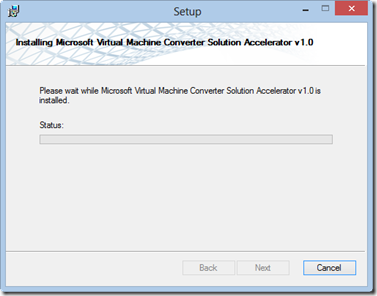
Wait for the installer to finish SNAGHTML82f4f98
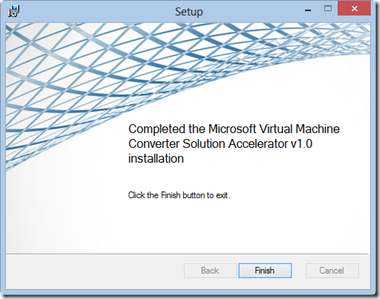
Click finish SNAGHTML82fbe12


Ok, let’s convert a VMDK file to a VHD file:

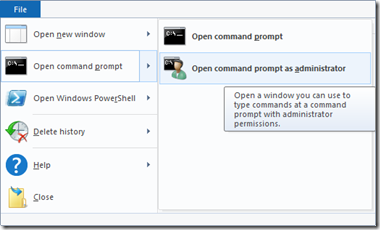
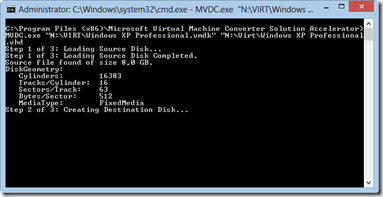
Open a Command Prompt as Administratror from the location C:\Program Files (x86)\Microsoft Virtual Machine Converter Solution Accelerator image
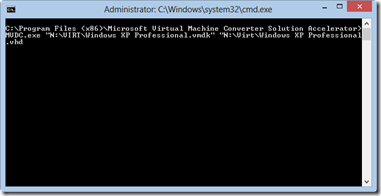
Use the following parameter to convert a VMDK file to a VHD file: 

MVDC.exe ‘.\VMDK\Test.vmdk’ ‘.\vhd\Test.vhd’

SNAGHTML8365f08
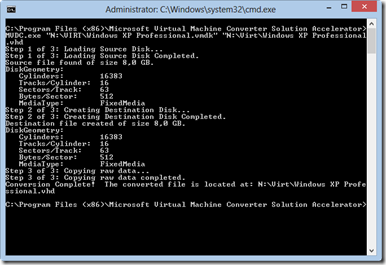
The conversion starts… SNAGHTML8362c01
Tada, finished SNAGHTML844345a
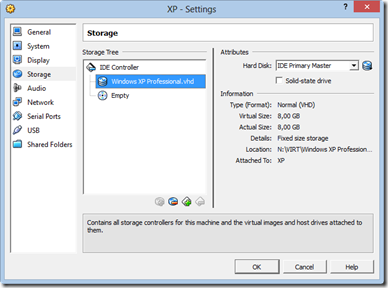
We can now add the VHD file to a Virtual Machine and boot it. I have used Virtual Box to test it. It took around 20 minutes to convert the 8 GB disk. SNAGHTML845b8d7


    • We can also convert a VMware Virtual Machine to a Hyper-V Virtual Machine but this requires vCenter Server 5.0 or vCenter Server 4.1 or ESXi Server 5.0 or ESXi/ESX Server 4.1.
    • I also tested the functionality to copy the “

C:\Program Files (x86)\Microsoft Virtual Machine Converter Solution Accelerator”  folder to another place and uninstall the MVMC program. This works well.

Import-ExchangeCertificate


Applies to: Exchange Server 2013

Topic Last Modified: 2012-10-16

Use the Import-ExchangeCertificate cmdlet to import a certificate or chain of certificates.

For information about the parameter sets in the Syntax section below, see Syntax.

Import-ExchangeCertificate -Instance <String[]> <COMMON PARAMETERS>
Import-ExchangeCertificate -FileData <Byte[]> <COMMON PARAMETERS>
Import-ExchangeCertificate -FileName <String> <COMMON PARAMETERS>
COMMON PARAMETERS: [-Confirm [<SwitchParameter>]] [-DomainController <Fqdn>] [-FriendlyName <String>] [-Password <SecureString>] [-PrivateKeyExportable <$true | $false>] [-Server <ServerIdParameter>] [-WhatIf [<SwitchParameter>]]

This example imports an existing certificate and private key from the PKCS #12 file ExportedCert.pfx.

Import-ExchangeCertificate -FileData ([Byte[]]$(Get-Content -Path c:\certificates\ExportedCert.pfx -Encoding byte -ReadCount 0)) -Password:(Get-Credential).password

This example imports a chain of certificates from the PKCS #7 file IssuedCert.p7b.

Import-ExchangeCertificate -FileData ([Byte[]]$(Get-Content -Path c:\certificates\IssuedCert.p7b -Encoding byte -ReadCount 0))

You can use the Import-ExchangeCertificate cmdlet for the following purposes:

  • To import a certificate or chain of certificates from a PKCS #7 file that has been issued by a certification authority (CA). PKCS #7 is the Cryptographic Message Syntax Standard, a syntax used for digitally signing or encrypting data using public key cryptography, including certificates.
  • To import an existing certificate and private key from a PKCS #12 (.pfx or .p12) file to the certificate store on the local computer. PKCS #12 is the Personal Information Exchange Syntax Standard, a file format used to store certificates with corresponding private keys protected with a password. The standard is specified by RSA Laboratories. For more information, see the PKCS #12: Personal Information Exchange Syntax Standard website.
    importantImportant:
    There are many factors to consider when you configure certificates for Transport Layer Security (TLS) and Secure Sockets Layer (SSL) services. You must understand how these factors may affect your overall configuration.
    noteNote:
    In Microsoft Exchange Server 2013, to import data from a file, you must use the Get-Content cmdlet to retrieve file data and use the FileData parameter to specify the retrieved data. This can be done in a two-step process, or in a single step. Examples shown in this cmdlet use the single-step approach.

The certificate may be published in Active Directory for the purposes of direct trust by using mutual TLS if the following conditions are true:

  • The certificate is marked as an SMTP TLS certificate.
  • The Subject Name on the certificate matches the fully qualified domain name (FQDN) of the local computer.

The certificate may be published in Active Directory by Edge Subscription if the following conditions are true:

  • You import the certificate to an Edge Transport server.
  • The certificate has an FQDN that matches the server FQDN.

The Import-ExchangeCertificate cmdlet imports either a certificate that’s issued from an outstanding request or a PKCS #12 file.

You need to be assigned permissions before you can run this cmdlet. Although all parameters for this cmdlet are listed in this topic, you may not have access to some parameters if they’re not included in the permissions assigned to you. To see what permissions you need, see the “Certificate management” entry in the Exchange and Shell Infrastructure Permissions topic.

To see the input types that this cmdlet accepts, see Cmdlet Input and Output Types. If the Input Type field for a cmdlet is blank, the cmdlet doesn’t accept input data.

To see the return types, which are also known as output types, that this cmdlet accepts, see Cmdlet Input and Output Types. If the Output Type field is blank, the cmdlet doesn’t return data.

Exchange 2010: How to Grant Send on Behalf Permissions for a Distribution Group


In some Exchange 2010 environments it is desirable to allow users to send email on behalf of a distribution group. However unlike for mailboxes, the Exchange Management Console doesn’t provide an option to grant this permission.

Note: this tutorial is for “send on behalf” permissions. If you’re looking for “send as” permissions go here instead.

To enable send on behalf permissions for a distribution group you need to use the Exchange Management Shell.  Launch the shell and use the Set-DistributionGroup command to set the permissions, for example:

Set-DistributionGroup "Sales Team" -GrantSendOnBehalfTo alan.reid

Alan Reid can now use the From field in an Outlook message to send on behalf of the Sales Team group.

Sending on Behalf of a Distribution Group

This is what the message will look like for the recipient.

A message sent on behalf of a distribution group

If they reply to the message it will go to the Sales Team distribution group, not the individual sender.

Replies go to the distribution group, not the individual sender

Alternatively you can grant the send on behalf permission to all members of the group, which can save on administrative effort over time if all group members should be allowed to send of behalf of the group they are in.

Set-DistributionGroup "Sales Team" -GrantSendOnBehalfTo "Sales Team"

Adding Additional Users or Groups to Send on Behalf Permissions

It is important to realise though that this setting is easy to overwrite if you try to add another user or group when there is already one that has been granted send on behalf permissions.

To demonstrate, here is the distribution group with the Sales Team granted send of behalf permissions.

[PS] C:\>Get-DistributionGroup "Sales Team" | fl name,grant*

Name                : Sales Team
GrantSendOnBehalfTo : {exchangeserverpro.net/Company/Groups/Sales Team}

Now if I use the same command as shown earlier to grant another group send on behalf permissions, it overwrites the existing setting instead of appending it.

[PS] C:\>Set-DistributionGroup "Sales Team" -GrantSendOnBehalfTo "Branch Office Team"

[PS] C:\>Get-DistributionGroup "Sales Team" | fl name,grant*

Name                : Sales Team
GrantSendOnBehalfTo : {exchangeserverpro.net/Company/Groups/Branch Office Team}

Instead we need to use a different method to add additional users or groups to the send on behalf permissions.

First, read the existing settings into a variable.

[PS] C:\>$a = Get-DistributionGroup "Sales Team"

Next, read the new group into a second variable.

[PS] C:\>$b = Get-DistributionGroup "Branch Office Team"

If you were adding an individual user you would just use Get-User instead of Get-DistributionGroup.

Then, append the distinguished name of the second group into the GrantSendOnBehalfTo value from the first group.

[PS] C:\>$a.GrantSendOnBehalfTo += $b.DistinguishedName

Finally, set the new value on the first group.

[PS] C:\>Set-DistributionGroup "Sales Team" -GrantSendOnBehalfTo $a.GrantSendOnBehalfTo

You can see now that both the Sales Team and Branch Office Team now have send on behalf permissions to the Sales Team distribution group.

[PS] C:\>Get-DistributionGroup "Sales Team" | fl name,grant*

Name                : Sales Team
GrantSendOnBehalfTo : {exchangeserverpro.net/Company/Groups/Sales Team,
exchangeserverpro.net/Company/Groups/Branch Office Team}

Removing Users or Groups from Send on Behalf Permissions

To remove one of the users or groups from having send on behalf permissions we use a similar process as we used to add them.

First, read the current setting into a variable.

[PS] C:\>$a = Get-DistributionGroup "Sales Team"

You can now see the distinguished names of the users or groups that currently have permissions.

[PS] C:\>$a.GrantSendOnBehalfTo | fl distinguishedname

DistinguishedName : CN=Sales Team,OU=Groups,OU=Company,DC=exchangeserverpro,DC=net

DistinguishedName : CN=Branch Office Team,OU=Groups,OU=Company,DC=exchangeserverpro,DC=net

Remove the one that you don’t want any more.

[PS] C:\>$a.GrantSendOnBehalfTo -= "CN=Branch Office Team,OU=Groups,OU=Company,DC=exchangeserverpro,DC=net"

Now apply the new setting to the distribution group.

[PS] C:\>Set-DistributionGroup "Sales Team" -GrantSendOnBehalfTo $a.GrantSendOnBehalfTo

You can see that the Branch Office Team has been removed from the send on behalf permissions.

[PS] C:\>Get-DistributionGroup "Sales Team" | fl name,grant*

Name                : Sales Team
GrantSendOnBehalfTo : {exchangeserverpro.net/Company/Groups/Sales Team}

Finally, if you want to remove all send on behalf permissions from a group you can run this command.

[PS] C:\>Set-DistributionGroup "Sales Team" -GrantSendOnBehalfTo $null

[PS] C:\>Get-DistributionGroup "Sales Team" | fl name,grant*

Name                : Sales Team
GrantSendOnBehalfTo : {}

Exchange 2013


Merhaba arkadaşlar,
Bu makalemde sizlere önümüzdeki yıl piyasaya çıkmasını beklediğimiz Microsoft Exchange Server 2013 ürününün bizlere neler getirceğinden kısaca bahsedip yazılımın Windows Server 2012 işletim sistemi üzerine kurulum işlemlerini gerçekleştireceğiz.

Microsoft Exchange Server 2013 Standart ve Enterprise olarak iki versiyon ile geliyor yine. Standart versiyonda bazı kısıtlamalar olacak yine. Bunlar tam olarak neler olacak bunları ürün piyasya sürüldüğünde yazmakta fayda görüyorum şu aşamada çünkü bu kadar çok değişiklik ile gelen bir ürünün bu iki versiyon arasında’da her an bazı değişiklilker yapılabilir diye düşünüyorum.

Microsoft Exchange Server 2013 ile birlikte Exchange 2007 ve Exchange 2010’da tanışmış olduğumuz 5 adet exchange server rolünün (CAS, HUB, Mailbox, Unified Messaging ve EDGE)  artık 3 tanesini ayrı olarak kurmadığımız göreceksiniz. Exchange 2013’ü artık sadece Client Access ve Malilbox Rolu ile kurulabildiğini göreceksiniz.

Client Access Server Rolun’de artık üzerinde bilgi barındırmadığını client ile mailbox sunucunun bağlantısını gerçekleştikten sonra görevinin bittiğini bildirmek isterim. Yedeklilik açısından 2 adet CAS kurup DNS server’iniz üzerinde her iki CAS’ında IP adresine gidecek aynı isimdeki kaydı yarttıktan sonra DNS’in round Robin özelliği kullanılarak her gelen istek başka bir CAS üzerine gönderilerek basit bir load balance yapılabilmektedir.

Microsoft Yeni Exchange server ile EMC (Exchange Management Console) ‘da tarihe gömüp yerine web tabanlı erişip çalıştırabileceğimiz ECP (Exchange Control Panel) yapısı ile tanıştırıyor artık bizi.

Owa’da bizleri yeni yüzü ile karşılıyor tabiki.

Exchange 2013’de kullanılabilen 2 ayrı rolu ayrı ayrı sunucular üzerinde kullanacak iseniz  önce Mailbox Rolunu daha sonra Client Access Server rolunu barındıran sunucuyu kurmamız önerilmektedir.

Exchange 2010 ile birlikte tanışmış olduğumuz yüksek erişilebilirlik için database yedekliliği sağlamış olduğumuz DAG mimarisi, Exchange 2013’te de bizlerle birlikte.

Exchange 2013 kurduktan sonra gidip ayarlardan Autlook Anyware enable etmeden, açmadan outlook’u bile bağlayamıyoruz artık Exchange 2013 server’a.

RPC over HTTPS Exchange 2013’le birlikte tarihe karışıyor artık. L Bunun yerine artık herşey TCP üzerinden gerçekleşiyor.

Exchange 2013 Kurulum İşlemleri :

Windows Server 2012 işletim sistemine kuracağız Exchange Server 2013’yi. Bizim test ortamımızda kullanacağımız domain name recepyuksel.local.  Test ortamında exchange server’i kuracağımız Win2012 sunucumuzun adını EXC2012 olarak düzenledik ve domain’e dahil ettik.

Exchange Server 2013 kurulum dosyasını aşağıdaki adresten indirebilirsiniz.

Exchange 2013 sunucumuzu yönetmek için domain ortamında exchangeadmin ismi ile bir kullanıcı hesabı oluşturduk.

Exchange Server 2013 kurulumu öncesinde Active Directory domain yapımızda değişiklikler yapacağımız için bu kullanıcı hesabına bu işlemleri yapabilmesi için Domain Admins, Enterprise Admins, Schema Admins yetkilerini vermemiz gerekiyor.
Win2012 sunucumuzu domain’e aldık Local Administrators grubu içine exchangeadmin isimli domain user’imizi ekleyip sunucumuzu bu kullanıcı hesabı ile açalım.
Sunucumuza exchangeadmin isimli domain kullanzımız ile logon olduktan sonra Power Shell’i Runas Admin ile açarak aşaıdaki komutları uygulayalım.

Import-Module ServerManager

Schema güncellemesini yapmadan önce Active Directory Management Tools kurulumu yapalım.

Power Shell’i Run as Administrator ile açmayı unutmayın UAC henüz kapatılmadı ise (UAC genelde kapatılması önerilir ama güvenlik sizin ön planda ise açık kalmasında fayda var ama bir iş yaparken yetki ile sorunlar yaşıyorsanız hemen aklınıza UAC gelsin ve Run as Admin’i hatırlayın derim).

Install-WindowsFeature RSAT-ADDS

Ortamdaki Active Directory Schemamızı güncelleyerek Exchange Server 2013 kurulumuna hazır hale getirelim şimdi.

Power Shell’i açıp Exchange Server kurulum dosyalarının bulunduğu folder’a giderek (setup.exe nin olduğu folder) aşağıdaki komutu çalıştıralım.

.\setup /PrepareAD /OrganizationName: ”Get-Mailbox” /IacceptExchangeServerLicenseTerms

Active Directory Schema güncellememiz yukarıdaki ekrandaki gibi sorunsuz bittikten sonra exchange server üzerinde ihtiyacımız olan featureların kurulması için aşağıdaki komut satırını power shell üzerinde çalıştıralım.

Install-WindowsFeature AS-HTTP-Activation, Desktop-Experience, NET-Framework-45-Features, RPC-over-HTTP-proxy, RSAT-Clustering, Web-Mgmt-Console, WAS-Process-Model, Web-Asp-Net45, Web-Basic-Auth, Web-Client-Auth, Web-Digest-Auth, Web-Dir-Browsing, Web-Dyn-Compression, Web-Http-Errors, Web-Http-Logging, Web-Http-Redirect, Web-Http-Tracing, Web-ISAPI-Ext, Web-ISAPI-Filter, Web-Lgcy-Mgmt-Console, Web-Metabase, Web-Mgmt-Console, Web-Mgmt-Service, Web-Net-Ext45, Web-Request-Monitor, Web-Server, Web-Stat-Compression, Web-Static-Content, Web-Windows-Auth, Web-WMI, Windows-Identity-Foundation


Kurulum işlemi yukarıdaki resimdeki gibi sorunsuz bittikten sonra sunucumuzu restart edelim.

Sunucumuzu yeniden açtıktan sonra aşağıdaki yazılımları sırasıyla sunucumuza kuralım.
  1. Microsoft Unified Communications Managed API 4.0, Core Runtime 64-bit
    http://www.microsoft.com/en-za/download/details.aspx?id=34992
  2. Microsoft Office 2010 Filter Pack 64 bit
    http://www.microsoft.com/en-us/download/details.aspx?id=17062
  3. Microsoft Office 2010 Filter Pack SP1 64 bit      http://www.microsoft.com/en-us/download/confirmation.aspx?id=26604
Bu yazılımlarıda kurduktan sonra sunucumuz Exchange Server 2013 kurulumu ön hazırlıklarını bitirmiş oluyoruz.

Sunucumuzu bu yazlımlarıda kurduktan sonra bir kez daha restart ettikten sonra Exchange Server 2013 yazılımı kurulum işlemlerine başlayabiliriz.

Exchange Server 2013 kurulum dosyaları içindeki setup.exe ile kurulum işlemlerine başlatalım.

İlk karşımıza çıkan ekranda eğer internet bağlantınız varsa updateleri kontrol etmesini öneririz.

Herhangi bir update bulunamadı.

Karşılama ekranı Plan your Exchange Server 2013 deployment seçip Next ile devam ederim.

Lisans Anlaşmasını onaylayalım.

Sunucumuz üzerinde oluşacak hataları otomatik olarak online kontrol etmesi öneriliyor.

Sunucumuz üzerine kurulacak rolleri seçebileceğimiz ekrana geldik. Zaten artık 2 adet rolumuz var. Biz tes ortamında her iki rolude aynı sunucuya kuruyoruz ikisinede seçelim. Tekrar hatırlatalım rolleri farklı sunucular’a kuracaksak önce Mailbox Server rolunu üzerinde barındıracak sunucuyu kurmalıyız.

Yazılımı kuracağımız disk sürücüsünü ve adresi seçiyoruz.

Virus ve Spyware kontollerini yaptırmak isteyip istemediğimiz soruyor bize. Biz burada seçmedik.

Sunucumuz Exchange Server 2013 kurulumu için hazırmı uygun durumda’mı kontrol ediliyor, herhangi  bir eksiklik varsa size bildirilecektir.
Gerekli servsilerin kurulumuna başlandı.
Kurulumumuz bitti sunucumu restart etmemiz öneriliyor Restart ettikten sonra artık Exhange sunucumuzun kurulumu işlemi bitmiş demektir. Bundan sonra yapılması gereken ayarlar var sırada.
Exchange Server kurulduktan sonra Active Directory üzerindeki değişiklikleri görmek için Active Directory Users and Computers’e gidelim. Microsoft Exchange Security Groups altında Exchange server kullanımında kullanabileceğimiz security gruplarını görebilirsiniz.
Microsoft Exchange System Objects objesi altındaki objeler aşağıdaki gibidir.
Hangi sunucular bu obje içinde diye kontrol ederseniz ortamdaki Exchange Server’a ait computer objesinin bu grubun üyesi olduğunu görebilirsiniz.
Exchange Server sunucumuz açıldıktan Exchange Server 2013 yazılımımızı aşağıdaki web adresinden Management Console erişerek yönetmeye başlayabilirsiniz.

https://exc2012/ecp  bizim sunucumuzun adını veya iç network’te IP adresini kullanabilirsiniz EXC2012 idi.

Ilk logon esnasında kullanmak istedigimiz dil’i soracaktır.

ve işte karşımızda yeni Exchange Yönetim Merkezi – Exchange Admin Center

Exchange Admin Center’da Exchange Server 2013 sunucumuzun ayarlarını yaparken kullanabileceğimiz ana başlıklar aşağıdaki gibidir.

Recipients
Permissions
Compliance Management
Organization
Protection
Mail Flow
Mobile
Public Folder
Unified Messaging
Servers
Hybrid
Not: Exchange server yönetim esnasında Internet Explorer 10 ile sorun yaşayan arkadaşlarımız olabilir, Firefox kurup onun üzerinden bağlanıp yönetmeyi deneyebilirsiniz.
Exchange Server 2013 Kurulum Sonrası Ayarlar
Exchange Server 2013 yüklendikten sonra syazılımın görevlerini tam olarak yerine getirebilmesi için mutlaka yapılması gereken ayarların listesi aşağıdaki gibidir. Sırası ile hangi ayar hangi bölümde ve nasıl ayarlanıyor bir sonraki makalem’de anlatmaya çalışacağım.

1-    Outlook Anywhere Ayarlanması. (Bu özellik açılmadan outlook’lar dahi sisteme bağlanamaz)
2-    Kurum dışına mail atabilmek için gerekli olan Send Connector’un yaratılması.
3-    Kurum dışından içeri mail alabilmek için gerekli olan Receive Connector ayarlanması veya yeniden yaratılması.
4-    Birden fazla domain name kullananlar için tüm domain adlarına gelen emailleri alabilmesi için Accepted Domain’lerin eklenmesi 5-    Exchange Server için Sertifika alınması

6-    Dışarıdan exchange server’a bağlantı için gerekli olan External URL’ ismi verilen dışarıdan erişim adreslerinin ayarlanması.

7-    Outlook Web App bağlantı tipinin yapılması.

8-    Outlook Web App Redirection ayarlarının yapılması.  (http olarak gelen kullanıcıların otomatik olarak https adresine yönlendirilmesi işlemi)

9-    Kullanıcıya veya bir gruba özel olarak e-mail address policy’lerin düzenlenmesi.

10-  Mobil Cihazların Bağlantısı için Gerekli Ayarların Yapılması

Güzel Günler Dilerim.

Kaynaklar:
http://technet.microsoft.com/en-us/library/bb124558.aspx

Error message when non-administrator users who have been delegated control try to join computers to a Windows Server 2003-based or a Windows Server 2008-based domain controller: “Access is denied”


Following steps delegates access for adding workstations to a domain.

To resolve the issue in which users cannot join a computer to a domain, follow these steps:

  • Click Start, click Run, type dsa.msc, and then click OK.
  • In the task pane, expand the domain node.
  • Locate and right-click the OU that you want to modify, and then click Delegate Control.
  • In the Delegation of Control Wizard, click Next.
  • Click Add to add a specific user or a specific group to the Selected users and groups list, and then click Next.
  • In the Tasks to Delegate page, click Create a custom task to delegate, and then click Next.
  • Click Only the following objects in the folder, and then from the list, click to select the Computer objects check box.
    Then, select the check boxes below the list, Create selected objects in this folder and Delete selected objects in this folder.

  • Click Next.
  • In the Permissions list, click to select the following check boxes:
    • Reset Password
    • Read and write Account Restrictions
    • Validated write to DNS host name 
    • Validated write to service principal name 
  • Click Next, and then click Finish.
  • Close the “Active Directory Users and Computers” MMC snap-in.

Source: http://support.microsoft.com/kb/932455

Exchange 2003 Üzerinde RPC over HTTPS Konfigürasyonu


Exchange 2003 olan bir yapıda kullanıcıların şirket dışında da Outlook’larının sanki şirkette gibi Exchange sunucusuna bağlı olarak çalışmasını sağladığımız metodun adı “RPC over HTTPS” Sistem 443 portu üstünde diğer gerekli portları tünelleyerek sizi her nerede olursanız olun sunucuya bağlı olarak çalışabiliyorsunuz. Bu güzel bir özellik ancak sistemciler için düşündüğünüzde konfigurasyonu çok sıkıntılı bir yapı. Allahtan Exchange 2007 ve 2010 çıktı ve sıkıntılar minimuma indi.
RPC over HTTPS konfigürasyonunu nasıl yapıldığını burada anlatmayacağım. Aşağıdaki linkler kurulum aşamasında işinizi görecektir. Benim burada paylaşmak istediğim tüm ayarlarınız doğru olsada yapınızı doğru çalışmaması durumunda sorun kullanılabilecek bir tool.

Tool’u indirmek için Tıklayınız

rpc

RPC over HTTPS Konfigürasyonu için uygulama sıralamanız aşağıdaki gibi olmalı.
1. Sertifika Edinin ve IIS sertifikanızı yükleyin. İster kendiniz bir Certificate Autority sunucu kurun, isterseniz gerçek bir Autority’den sertifika edinin.
http://www.msexchange.org/tutorials/SSL_Enabling_OWA_2003.html

2. RPC over HTTPS bileşenini server’a kurun ve gerekli ayarlamaları yapın.
http://www.msexchange.org/tutorials/Outlook_2003_Connect_Exchange_2003.html
http://www.cozumpark.com/blogs/exchangeserver/archive/2008/04/26/rpc-over-https-single-server.aspx

3. Firewall’dan 443 ve 135 portlarını açmayı unutmayın


Bu yazılar sertac.gen.tr sitesinden alıntıdır.

The Certificate is Invalid for Exchange Server Usage


Local CA’dan yada Global bir CA’dan aldığınız sertifikayı Exchange 2010’a yüklediğinizde aşağıdaki gibi bir hata alabilirsiniz. Bunun sebebi yüklediğiniz sertifikadaki CA nın bilgisayarınız tarafından güvenilen bir authority olarak tanınmamasıdır.

invalid1

Eğer Local CA’dan aldığınız bir sertifika ise aşağıdaki şekilde sorunu giderebilirsiniz. Global bir CA’dan alınan bir sertifika ise aldığınız firma mutlaka authority nin sertifikasınıda yollamıştır. Bu sertifikayı bilgisayarınıza yüklemeniz yeterli.

ca-cert01

ca-cert02

chain021

chain031

chain041

valid1


Bu yazılar sertac.gen.tr sitesinden alıntıdır.